Video and cameras
Drone Control supports up to three configured camera streams. The number, name, and availability depend on the selected drone.
The current Drone Control interface enables camera buttons only while the selected drone has connected, current telemetry. Client accounts do not open telemetry links in this interface, so they cannot start the saved cameras from these buttons. This is an interface limitation, even though the playback service permits Clients to read video for their assigned drones. Changing a licence or granting Harlock remote control does not remove it. Report this symptom to support rather than changing camera sources to work around it.
Configure camera sources
Available to Administrators and Operators.
The vehicle must already have a saved connection record. Prepare its onboard computer enrolment before saving camera slots.
The supported vehicle runtime publishes a fixed camera on each slot:
| Slot | Camera path | Intended camera |
|---|---|---|
| 1 | camera-1 | MT11 zoom |
| 2 | camera-2 | MT11 thermal |
| 3 | camera-3 | R1M FPV |
Names are display labels; renaming a slot does not move a camera to another vehicle path. Use the source assigned to that slot by the responsible technician. The FPV camera has a fixed lens, so it does not provide optical zoom.
- Open Drones, select the drone, then open Streams.
- For each required slot, enter the camera name (up to 40 characters) and RTSP or RTSPS source supplied for that vehicle.
- Enable the gimbal option only for a camera configured to support it.
- Select Save changes.
Drone Control offers configured cameras by name, or as Stream 1, Stream 2, and Stream 3 when no name is set. Only slots with a saved source are offered. Use the remove action and confirm to remove a saved camera configuration.
Camera configuration is saved separately from starting playback. After saving, return to Drone Control and select the correct drone to load its configured cameras. If you change a source while a player is already open, stop that stream and reload Drone Control before testing the saved source.
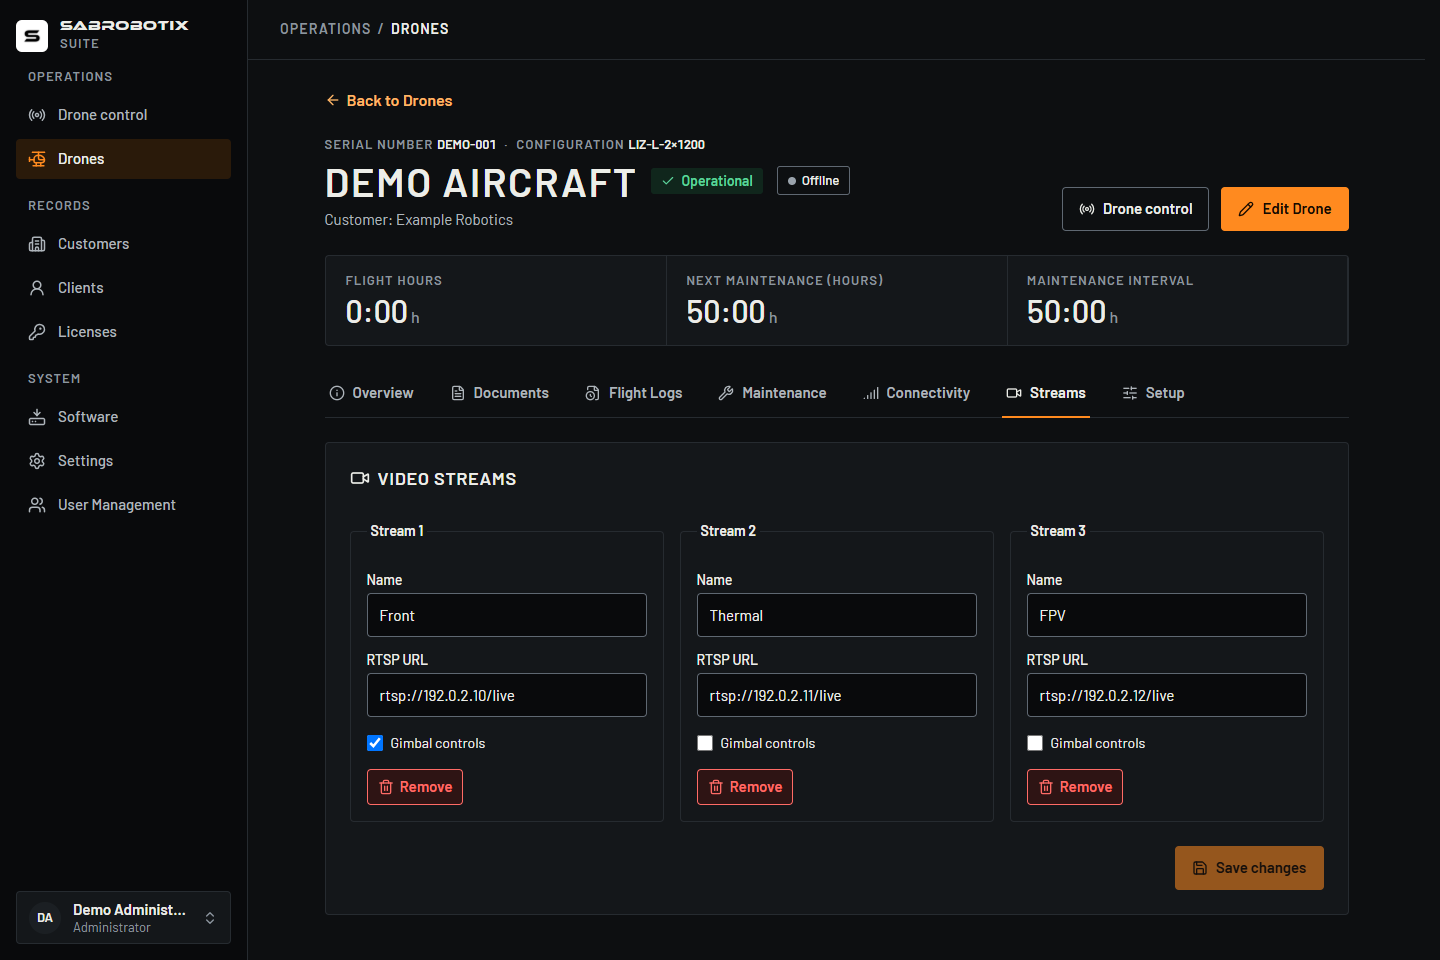 Administrator view with example camera addresses; these sources are not connected.
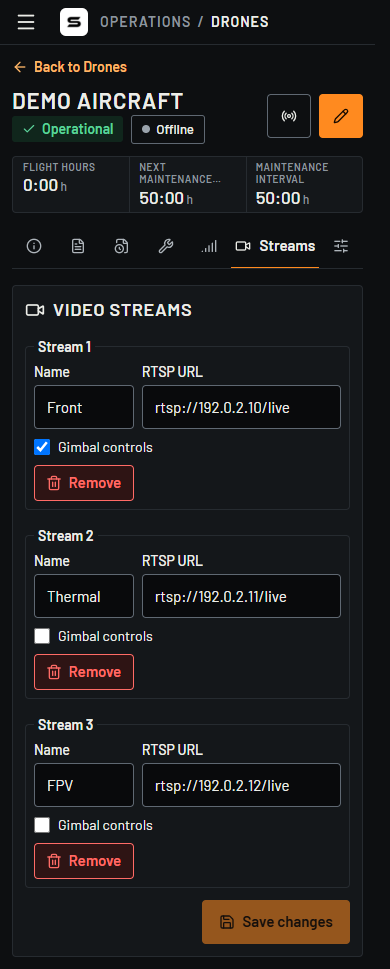 Administrator view with demonstration zoom-slot, thermal, and FPV sources in the compact layout. Scroll the page to reach all three slots and Save changes.
Removing a saved camera takes effect as soon as you confirm. Changes still being edited for the other cameras remain in their forms until you save them. Confirm all intended slots after saving or removing a source.
Open a stream
- As an Administrator or Operator, select the drone in Drone control and wait for connected telemetry.
- Find the camera buttons over the map, labelled with the saved names or numbered stream labels. On a narrow screen, open Cameras to choose a stream.
- Select the required camera button to start playback.
- Wait for Stream connected and visible video.
In this interface, an offline or stale telemetry state disables the camera launcher. A working telemetry connection does not establish that a camera is publishing; check the player independently. An already established media session has its own lifecycle and may continue after telemetry drops.
The video appears in a floating window over the map. Drag its header to move it without covering important controls.
Inline, floating and detached windows use Drone name · Camera name, with the numbered stream label when the camera has no saved name. The detached browser tab uses the same title.
Administrators and Operators change camera sources in the drone's Streams tab. Client playback authorization and the current launcher limitation are separate; see the notice at the start of this page.
Use multiple streams
Select each camera's named button separately. Each stream has its own connection state and controls.
- Move the windows to keep the map and flight data visible.
- Hide a window to clear the map; use its numbered video button to show it again.
- Stopping one player does not stop the other players.
- Different cameras can become ready at different times.
Open video in another window
Select Open stream in new tab on the stream window. Your browser may describe this as a pop-up window.
If nothing opens:
- Look for a blocked pop-up notice in the browser.
- Allow pop-ups only for the trusted Suite address.
- Try the action again.
Use Return inline in the external window to place the video back over the map, or close it when finished.
Stop or close a stream
- Select the active camera's named button again to end playback for that camera.
- Use the close or hide control when you want to remove the window but may reopen it.
- Stop unnecessary streams to reduce data use, especially over a mobile connection.
Closing, stopping, or detaching a published player affects that browser's playback. It does not stop the camera's path on the vehicle, because Harlock or another browser may be watching it. A published path with no viewers sends no video over the vehicle's mobile link. Stopping your player does not disconnect other viewers or prove that nobody else is using that camera.
Control a gimbal
Gimbal control appears only for a configured camera and is available to Administrators and Operators.
- Start the camera stream.
- Place the pointer on the gimbal control overlay.
- Drag in the direction you want the camera to move.
- Release to stop the movement command.
- Confirm the result in the live image before sending another movement.
Use short, controlled movements. Network delay can make the image respond after the command.
Camera zoom
The current gateway contract does not expose a read operation for the measured
zoom multiple. The Suite therefore cannot display a trustworthy current N×
value. A successful zoom command alone does not prove the current optical factor,
particularly when another controller also operates the camera.
Zoom controls appear on active camera streams for Administrators and Operators. Tap + or − for one optical step, or hold a button to repeat the steps. Confirm the result in the live image before sending more commands.
The camera must support optical zoom. A fixed-lens camera cannot zoom even if the control is visible. If zoom fails, check the selected camera and its saved source with the responsible operator. Gateway integration details are in Video: camera controls.
If video does not open
- Confirm the correct drone and camera slot.
- Check that remote access is enabled. A disabled camera button requires connected telemetry in the current interface; a Client account encounters the limitation described above. If no camera button appears, ask an Administrator or Operator to check the saved source in the drone's Streams tab.
- Wait for the camera to start publishing.
- Stop the stream and start it once more.
- Try the other configured stream to determine whether the issue is camera-specific.
- Check SIM data availability and network quality.
- If the Suite reports Stream unavailable, the onboard camera publisher may be offline; contact the responsible operator or support.
Video delay may increase on a weak or congested connection. Do not use delayed video as the only source for obstacle avoidance or precise manual positioning.